
Footwear Insights
High-Heel Balance and Construction: What Buyers Should Approve

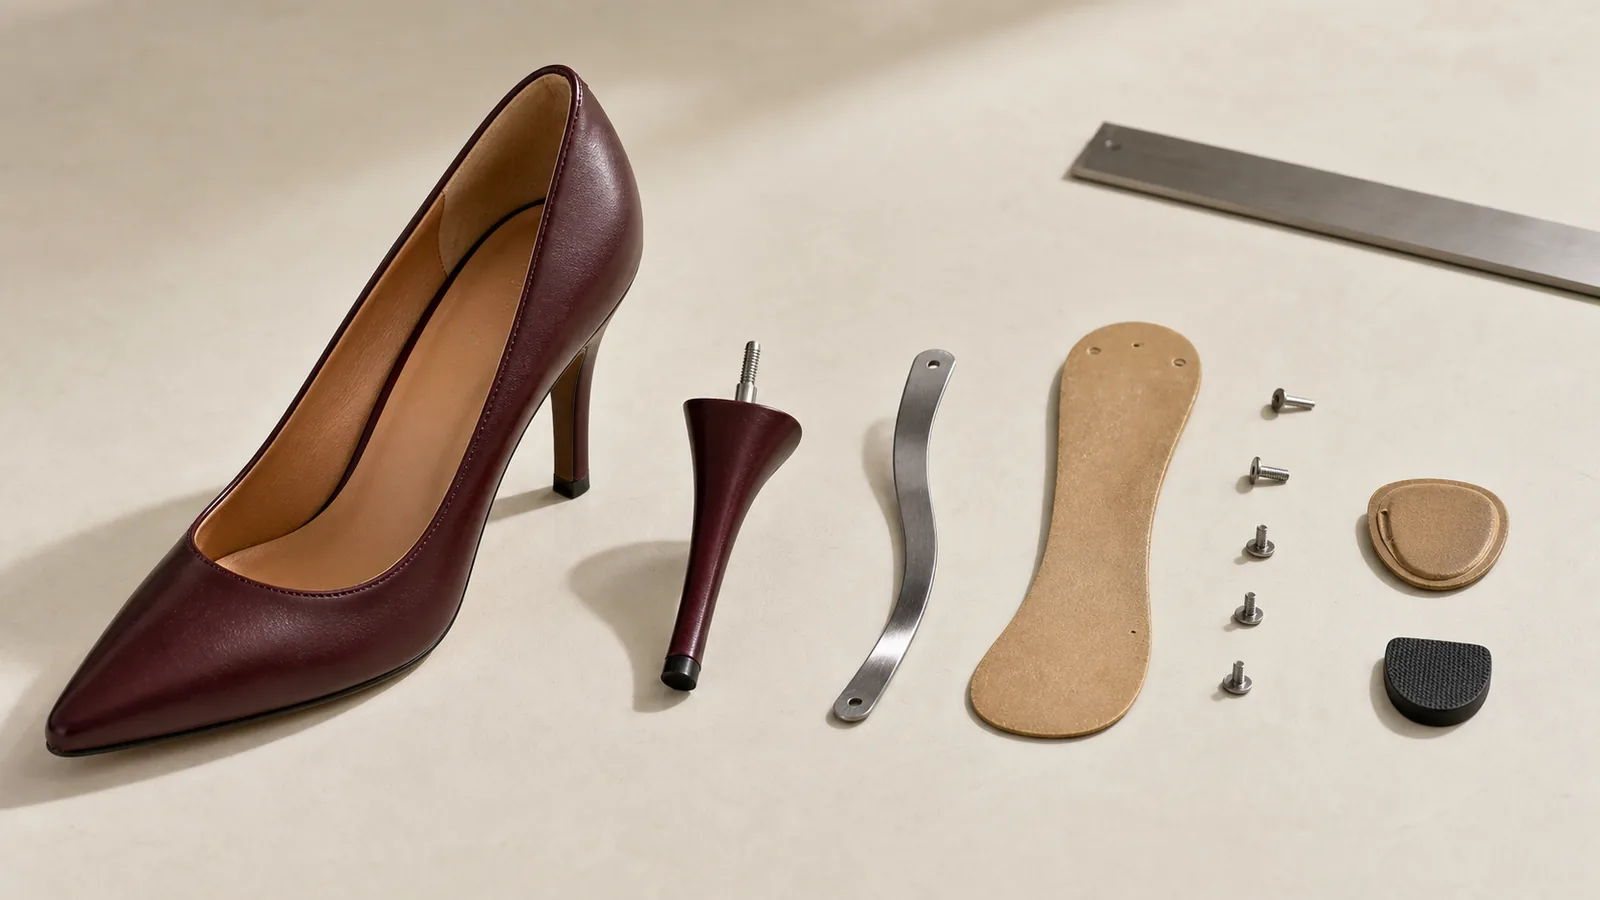
A stable high heel is a matched system: last, heel geometry, heel seat, shank, insole, outsole, upper hold and top piece must work together. Buyers should approve the assembled shoe on a level surface and on foot, then support that review with component and whole-shoe tests chosen for the construction. Heel height alone does not determine balance, and a strong heel cannot compensate for a mismatched seat or weak attachment.
Treat every heel-height or last change as a structural review, not a cosmetic edit.
What creates high-heel balance?
| Element | Why it matters | What to approve in the sample |
|---|---|---|
| Last and pitch | Establish foot position, toe spring and heel-seat relationship | Last code, size, heel-height basis and intended fit |
| Heel geometry | Positions the support area under the rearfoot | Profile, height, base/top dimensions and centerline alignment |
| Heel seat | Transfers load between shoe and heel | Full, even seating without visible gaps or rocking |
| Shank and insole | Reinforce the waist and resist repeated loading | Correct length, position, stiffness direction and attachment |
| Heel attachment | Holds the heel to the shoe structure | Fastener pattern/process and production-intent assembly |
| Top piece | Provides the replaceable ground-contact surface | Material, footprint, orientation and retention method |
| Upper/fastening | Holds the foot in the intended position | Heel hold, vamp/strap security and pressure points |
The visual center of a fashion heel may not equal its structural load path. Ask the technician to confirm the heel/last combination and attachment system rather than moving the heel on a rendering.
Start with the last, heel and outsole together
The last establishes the three-dimensional shape around which the shoe is built. Its heel-seat curve, pitch and toe spring must agree with the heel and bottom components. ISO 19409:2022 gives methods for measuring basic last dimensions physically or on a digital model; use a controlled last code and revision so two rounds do not quietly use different geometry.
For each sample, record:
- Last code, size and revision.
- Heel code, nominal height and measurement convention.
- Outsole or forepart thickness that affects effective pitch.
- Heel-seat and breast geometry.
- Shank, insole board and reinforcement specification.
- Fasteners, adhesive/process and top-piece system.
A thicker forepart can change effective pitch even when the heel itself is unchanged. Likewise, transferring one heel to another last may create a seat gap or shift contact.
Run a practical static balance review
Place each shoe on a verified level, rigid surface without forcing it into position. Review the pair from the rear, side and bottom. Record rather than hand-correct:
- Does the heel/top piece sit flat in its intended orientation?
- Does the forepart contact as intended for the construction?
- Does the shoe rock under light, repeatable pressure?
- Are left and right shoes symmetrical in heel position and upper alignment?
- Are there gaps or uneven contact at the heel seat?
- Does the top piece align with the heel and expected wear direction?
This is an approval check, not a substitute for mechanical testing or wearer evaluation. Define the fixture, surface and tolerance in the buyer’s own QC specification if measurements are required.
Check fit and movement—not just table balance
A shoe that stands neatly can still feel unstable if the foot slides forward, the heel lifts, a strap stretches or the platform compresses unevenly. Use representative testers, the intended hosiery and a controlled walking route. Observe entry, forefoot pressure, heel hold, lateral movement, strap security and transitions during steps and turns.
Record tester foot data and sample size. Do not make population-wide comfort claims from one wearer. If the fit correction changes the upper hold, padding or foot position, repeat the balance review.
D6’s custom high heel development page lists core inputs—style, heel height, material, outsole, size range and target market—that should be aligned before sampling.
Approve the hidden structural parts
The shank reinforces the waist region and works with the insole and heel attachment. Confirm its material, length, curvature, orientation and location in the approved construction. ISO 18895 specifies a fatigue test for steel shanks of at least 100 mm used in women’s and some other footwear; suitability and acceptance limits must be set for the actual design.
Heel pins, screws or nails must suit the heel material and process. ISO 19957:2021 measures the force required to pull a single heel pin from applicable plastic or wooden heels and can also assess commercial heel nailing. It does not apply to every heel construction, so the laboratory should confirm scope.
Do not rely on destructive results from a separate component if production assembly changes fastener position, insertion or material.
Match ISO tests to the failure mode
| Risk | Relevant ISO method | What it evaluates |
|---|---|---|
| Occasional heavy side blow | ISO 19953 | Lateral impact resistance of ladies’ shoe heels |
| Repeated impacts in walking | ISO 19956 | Heel fatigue resistance, especially useful for reinforced plastic heels |
| Shank repeated loading | ISO 18895 | Fatigue resistance of eligible steel shanks |
| Pin pull-out | ISO 19957 | Heel material pin holding and/or production nailing |
| Top-piece pull-out | ISO 24264 or ISO 19958, by construction | Attachment/retention of applicable heel top pieces |
| Upper-to-sole separation | ISO 17708 | Bond separation or adjacent sole-layer failure in eligible constructions |
The method does not supply a universal pass mark for every fashion shoe. Build the plan from target market, end use, customer standard, heel shape and laboratory advice. Test production-intent components after significant source, material, geometry or process changes.
A buyer approval workflow
- Freeze intended wearer, size range, heel height convention and target market.
- Approve the last/heel/outsole combination in the base size.
- Review static contact, seat fit, symmetry and rocking on a defined surface.
- Conduct a controlled fit and movement review.
- Confirm hidden components and attachment instructions in the BOM/drawing.
- Complete applicable heel, shank, top-piece and bond tests.
- Check selected size-set shoes for grading and proportional changes.
- Seal the confirmation sample and prohibit unapproved structural substitutions.
Photograph rear, side, bottom and heel-seat views for the approval record. A written “heel approved” comment is too broad to control later production.
Production checks buyers should retain
At incoming or in-line control, verify heel and top-piece identity, key dimensions, molded defects and fastener/process settings. At final inspection, check pair symmetry, visible seat gaps, heel/top-piece orientation, rocking, attachment defects and damage. Destructive tests need a defined frequency outside routine visual inspection.
If the style uses light upper materials or metallic finishes, add migration, abrasion and finish-damage checks around the heel and outsole interface. Packaging should prevent concentrated load on the heel during shipment.
FAQ
Is a wider heel always more stable?
Not automatically. A larger contact area may help, but stability also depends on placement, last pitch, upper hold, forepart design, material behavior and wearer interaction.
Can the same heel be used on another last?
Only after technical review. The heel seat, pitch, height and load path must match; a visually similar last can have different bottom geometry.
Does passing a heel impact test prove the whole shoe is safe?
No. It addresses a defined failure mode under a specified method. Fit, shank, attachment, top piece, sole bond and other product risks still need evaluation.
When should a high-heel style be retested?
Retest or re-evaluate after relevant changes to heel material/source, reinforcement, geometry, top piece, shank, fastener, last, outsole thickness, adhesive or assembly process.
Send the complete heel system for development
Share the side/profile reference, heel-height convention, last or fit direction, size range, materials, outsole/forepart construction, target market and required tests. Then contact D6 with the project brief so the feasibility and sampling route can be discussed without assuming unverified performance.
Sources & references
- ISO, *ISO 19409:2022 — Measurement of last dimensions*: https://www.iso.org/standard/81028.html
- ISO, *ISO 19953:2004 — Heel lateral impact resistance*: https://www.iso.org/standard/34012.html
- ISO, *ISO 19956:2004 — Heel fatigue resistance*: https://www.iso.org/standard/34015.html
- ISO, *ISO 18895:2006 — Shank fatigue resistance*: https://www.iso.org/standard/38918.html
- ISO, *ISO 19957:2021 — Heel pin holding strength*: https://www.iso.org/standard/77593.html
- ISO, *ISO 24264:2020 — Top-piece attachment strength*: https://www.iso.org/standard/78249.html
- ISO, *ISO 19958:2004 — Top-piece retention strength*: https://www.iso.org/standard/34017.html
- ISO, *ISO 17708:2018 — Whole-shoe upper-sole adhesion*: https://www.iso.org/standard/68281.html